
Brivis ducted heating systems are renowned for their reliability and energy efficiency, providing consistent warmth across homes. Designed with advanced technology, they ensure optimal heating solutions for various spaces.
Overview of Brivis Ducted Heating Technology
Brivis ducted heating systems utilize advanced technology to deliver efficient and consistent warmth across homes. They operates by circulating heated air through a network of ducts, ensuring even distribution. The systems are designed to integrate with various home layouts, offering customizable solutions. Regular maintenance, such as checking power supply and ensuring duct outlets are open, is crucial for optimal performance. Troubleshooting steps often involve inspecting circuit breakers and recalibrating thermostats. This technology combines reliability with energy efficiency, making it a popular choice for homeowners seeking durable heating solutions.
Importance of Regular Maintenance and Troubleshooting
Regular maintenance and timely troubleshooting are essential for extending the lifespan of Brivis ducted heating systems. Neglecting upkeep can lead to reduced efficiency, higher energy bills, and premature system failure. Simple checks, such as ensuring circuit breakers are functioning and vents are unblocked, can prevent major issues. Additionally, addressing error codes promptly helps maintain system performance. Routine maintenance not only enhances reliability but also ensures safety, preventing potential hazards like gas leaks or electrical faults. Consistent care guarantees optimal heating and minimizes costly repairs over time.
Common Issues in Old Brivis Ducted Heating Systems
Old Brivis systems often face power supply problems, error codes, and uneven heating. Regular maintenance can help identify and resolve these issues before they escalate, ensuring efficiency and safety. Additionally, duct blockages and thermostat malfunctions are frequent concerns that require prompt attention to maintain optimal performance and prevent system shutdowns. Addressing these issues early prevents costly repairs and extends system lifespan, ensuring consistent heating throughout the home. Regular inspections and timely troubleshooting are crucial for maintaining the reliability and effectiveness of older Brivis ducted heating systems. By staying proactive, homeowners can enjoy uninterrupted comfort and energy savings. Furthermore, understanding common issues enables users to take preventive measures, reducing the need for professional interventions and enhancing overall system durability. Proper care and attention to these areas ensure that old Brivis systems continue to deliver reliable heating for years to come.
Power Supply Problems
Power supply issues are common in old Brivis systems. Check the circuit breaker or fuse box for tripped switches or blown fuses, which can disrupt operation. After an electrical storm or power surge, the system may fail to start. Ensure all electrical connections are secure and not damaged. If problems persist, consult a professional to inspect wiring and capacitors, as faulty components can cause recurring issues. Regular inspections and timely repairs prevent shutdowns and ensure reliable heating. Addressing these issues early maintains system efficiency and safety.
Error Codes and Their Meanings
Error codes on old Brivis systems indicate specific issues. For example, a code may signal a blocked vent or insufficient airflow. Understanding these codes helps diagnose problems quickly. Common codes relate to duct system blockages or Ignition failures. Refer to the manual or manufacturer’s guide for code meanings. Addressing the root cause, like clearing blocked vents, often resolves the issue. Persistent errors may require professional assistance to prevent further system damage. Regular maintenance can help minimize error occurrences and ensure smooth operation. Always consult the troubleshooting guide before attempting repairs.
Uneven Heating or No Heat
Uneven heating or no heat in old Brivis systems often stems from blocked or closed vents, duct leaks, or a faulty thermostat. Check if vents are open and unobstructed. Inspect ducts for leaks or damage, as gaps can cause heat loss. Ensure the thermostat is set correctly and functioning properly. If issues persist, a professional may need to inspect the system for internal faults or damper malfunctions. Addressing these problems promptly can restore consistent heating and prevent further system degradation over time. Regular maintenance is key to avoiding such issues.
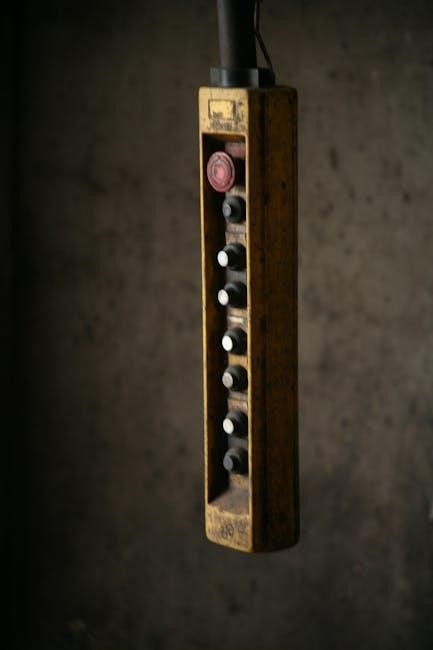
Troubleshooting the Brivis wall controller involves checking power supply issues, resetting the controller, and diagnosing display problems. Ensure circuit breakers are intact and try resetting for optimal function. Begin by inspecting the circuit breaker or fuse box. A tripped breaker or blown fuse can disrupt power to the Brivis system. Switch off the breaker, wait, then reset it. If the issue persists, check for blown fuses and replace them if necessary. Ensure all electrical connections are secure and functioning properly. This step is crucial to restore power and ensure the system operates correctly. Always prioritize safety when handling electrical components. To reset the wall controller, start by switching off the power at the circuit breaker or fuse box. Wait for a few minutes to allow any residual power to dissipate. Then, switch the power back on. Check if the controller functions correctly. If it doesn’t, look for a small reset button, usually recessed, and press it with a pin or tool for a few seconds. Release and test the system. If issues persist, it may indicate a more serious problem requiring professional help. This process can clear software glitches or power-related issues, making it a good first troubleshooting step. Display issues on older Brivis systems can include a blank screen, flickering, or unresponsive buttons. First, ensure the power supply is stable and the circuit breaker hasn’t tripped. Check for loose wiring or connections behind the controller. If the display is dim or faded, adjust the brightness settings. For error codes, refer to the manual or manufacturer’s guide. If the issue persists, it may indicate a faulty display module or internal electronics, requiring professional replacement or repair. Regular cleaning of the screen can also prevent minor display malfunctions. Inspect ducts for blockages or damage to ensure proper airflow. Check vents for obstructions and ensure they’re open. Verify duct installation for leaks or improper connections. Check each vent in your home for blockages or closure. Ensure no furniture or carpets obstruct airflow. If vents are closed, open them to restore proper air circulation. Examine the ductwork for visible cracks, gaps, or signs of wear. Leaks reduce system efficiency and increase energy costs. Seal damaged areas with appropriate materials to maintain optimal airflow and heating performance. Verify that the duct system is installed correctly, with all vents open to ensure even heating. Improper installation can lead to reduced efficiency and uneven temperature distribution throughout your home. Thermostat malfunctions can cause inconsistent heating. Check settings and ensure compatibility with your system for accurate temperature control and optimal performance during operation. Start by verifying the thermostat settings to ensure they are correctly configured for your desired temperature. Check if the thermostat is in heating mode and adjust the temperature setpoint if necessary. Ensure that the thermostat is properly powered and that all wires are securely connected. If the display is unresponsive, try resetting the thermostat by turning it off and on again. Additionally, check for any error codes or unusual behavior, which may indicate a deeper issue requiring professional attention. Regular checks help maintain consistent heating performance. Recalibrating your Brivis thermostat ensures accurate temperature control. Start by turning off the power supply to the system. Access the thermostat’s menu and select the calibration option. Follow the on-screen instructions to reset the temperature baseline. Ensure the thermostat is located away from direct heat sources or drafts to maintain precision. After calibration, test the system by adjusting the temperature to confirm smooth operation. Regular recalibration helps prevent heating inconsistencies and improves overall system efficiency, ensuring your home remains comfortably heated. This step is crucial for maintaining optimal performance. Ensuring your thermostat is compatible with your Brivis ducted heating system is crucial for optimal performance. Older models may require specific thermostats designed for their technology. Check the manual or manufacturer’s guidelines to confirm compatibility. Upgrading to a modern thermostat, like the Brivis Touch Wi-Fi, can enhance functionality and control. Incompatible thermostats may lead to operational issues or reduced efficiency. Always consult a professional if unsure, as incorrect installations can cause system malfunctions or safety risks, ensuring your heating system operates effectively and safely throughout the seasons. Brivis ducted heating systems include advanced safety mechanisms to detect faults, preventing potential hazards. Error codes provide specific insights into issues, guiding effective troubleshooting and repair processes. Brivis ducted heating systems utilize specific fault codes to indicate malfunctions, ensuring user safety and guiding troubleshooting. These codes, displayed on the controller, signify issues like sensor failures or gas problems. By referencing the manual, homeowners can interpret codes such as “E1” (sensor fault) or “E2” (ignition failure) to identify the root cause. This feature prevents further damage and potential hazards, allowing timely repairs. Understanding these codes is crucial for maintaining system efficiency and safety, ensuring your heating system operates reliably year-round. If your Brivis ducted heating system triggers a safety shutdown, resetting it involves a few straightforward steps. First, ensure the power supply is stable by checking the circuit breaker or fuse box. Next, allow the system to cool down for at least 30 minutes to prevent overheating issues. After this, reset the wall controller by switching it off and on again. If the system doesn’t restart, consult the manual or contact a professional. Always verify the cause of the shutdown before resetting to ensure safe operation. Regular maintenance is key to preventing recurring safety issues in old Brivis ducted heating systems. Ensure the duct system is clear of blockages and leaks, as these can trigger safety shutdowns. Check ventilation outlets and ensure proper airflow to avoid overheating. Inspect electrical connections and components annually, and replace worn-out parts promptly. Refer to the manual for specific guidelines and consider professional servicing to address underlying issues. By addressing these factors, you can enhance system reliability and safety, reducing the likelihood of repeated shutdowns and potential hazards. Address airflow problems by checking for blockages in vents and ensuring proper duct installation. Clean filters regularly and inspect fan motors for optimal performance and efficiency. Regular inspection and cleaning of air filters are crucial for maintaining efficient airflow in your Brivis ducted heating system. Turn off the power supply before removing the filter. Check for dust, debris, or mold buildup and clean the filter according to the manufacturer’s instructions. If the filter is damaged or excessively dirty, replace it with a compatible unit. Dirty filters can reduce airflow, increase energy consumption, and strain the system. Ensure filters are clean and properly installed to optimize heating performance and prevent potential issues. To ensure proper airflow, inspect the fan motor regularly. Switch off the power supply before accessing the unit. Check for blockages like dust or debris around the motor. Verify that the fan blades are clean and undamaged. Listen for unusual noises, which may indicate worn bearings or misalignment. If the motor fails to start, check the circuit breaker or fuse box. Ensure the fan operates smoothly, as a malfunctioning motor can reduce heating efficiency and cause system strain. Clean or replace components as needed to maintain optimal performance. Airflow restrictions can significantly reduce the efficiency of your Brivis ducted heating system. Start by inspecting vents for blockages, such as furniture or debris, and ensure they are fully open. Check the duct system for leaks or obstructions, as these can disrupt airflow. Additionally, clean or replace air filters to improve circulation. If issues persist, consider recalibrating the thermostat or ensuring proper system installation. Addressing airflow problems promptly can prevent uneven heating and ensure consistent warmth throughout your home. Regular maintenance is key to maintaining optimal performance. Electrical issues in old Brivis systems often stem from faulty capacitors or wiring. Inspect connections and components for wear. If problems persist, consult a licensed technician. Faulty capacitors or wiring can cause electrical malfunctions in old Brivis systems. Look for signs like swelling capacitors, burned wires, or flickering lights. Check connections for looseness. Use a multimeter to test capacitance and resistance. If issues are found, replace components promptly to prevent further damage. Always turn off power before inspecting. If unsure, consult a professional to ensure safety and proper system function. Start by inspecting your circuit breaker or fuse box. If a breaker has tripped, switch it off and back on. Ensure it stays in the ‘on’ position. If it trips again, there may be an electrical overload. Check for loose connections or short circuits. Consult your manual or contact a professional if issues persist. Regular checks can prevent recurring problems and ensure safe operation of your Brivis system. Always prioritize electrical safety when troubleshooting. Regularly inspect all electrical connections to ensure they are secure and free from damage. Check for signs of wear, corrosion, or loose wires. Verify that all connectors are tightly fastened. If you find any issues, disconnect the power supply before making repairs. Ensure all components are properly grounded to prevent safety hazards. Consult your Brivis manual for specific instructions or contact a licensed electrician if unsure. Maintaining reliable electrical connections is crucial for optimal system performance and safety. Old Brivis systems may face ignition failures due to faulty gas valves or clogged burners. Ensure proper gas supply and clean components regularly for reliable operation. For old Brivis systems, gas ignition issues often stem from faulty spark electrodes or blocked gas lines. Check if the gas supply is uninterrupted and ensure all valves are open. Clean the burner and ignition area to remove any debris. If problems persist, inspect the igniter for wear and replace it if necessary. Always verify the gas pressure matches the system’s specifications to prevent recurring ignition failures. Ensure the gas supply valve is fully open and verify there are no leaks in the gas line. Use a pressure gauge to check if the gas pressure matches the manufacturer’s specifications. If the pressure is too low, it may indicate a regulator issue or blockage. Consult the manual for recommended pressure levels and ensure all connections are secure. Proper gas supply and pressure are crucial for efficient and safe operation of the Brivis ducted heating system. Turn off the power and allow the system to cool before inspecting the heat exchanger. Look for signs of cracks, corrosion, or soot buildup, which can reduce efficiency and safety. Use a flashlight to examine the exchanger’s surface thoroughly. If damage is found, do not operate the system until it’s repaired. Annual professional inspections are recommended to ensure the heat exchanger remains in good condition, preventing potential safety hazards and maintaining optimal heating performance in your Brivis ducted system. Call a professional if issues persist despite troubleshooting, such as recurring faults or complex system malfunctions, to ensure safety and efficiency in your Brivis ducted heating system. If your Brivis system displays persistent error codes, has no heat output, or experiences frequent shutdowns, these are signs that professional intervention is necessary. DIY solutions may not address underlying issues like faulty components or complex system malfunctions. Ignoring these symptoms can lead to further damage or safety hazards, emphasizing the need for expert diagnosis and repair to restore functionality and ensure optimal performance. While basic troubleshooting steps can resolve minor issues, complex problems often require specialized tools and expertise. Homeowners may inadvertently cause further damage by attempting repairs beyond their skill level. Electrical components, gas ignition systems, and ductwork require professional attention to ensure safety and efficiency. Recognizing these limitations is crucial to avoid complications and maintain the system’s integrity, emphasizing the importance of seeking qualified assistance when issues exceed DIY capabilities. Regular maintenance is key to extending the lifespan of your Brivis ducted heating system. Schedule annual professional inspections to check for wear and tear, clean filters, and ensure proper airflow. Additionally, inspect ducts for leaks and blockages, and replace worn-out components promptly. Homeowners should also monitor the system’s performance, noting any unusual noises or temperature fluctuations. By adhering to a routine maintenance schedule, you can prevent unexpected breakdowns and maintain optimal heating efficiency throughout the year.Troubleshooting the Brivis Wall Controller
Checking the Circuit Breaker or Fuse Box
Resetting the Wall Controller
Diagnosing Display Issues
Duct System and Ventilation Troubleshooting
Identifying Blocked or Closed Vents
Inspecting Duct Leaks or Damage
Ensuring Proper Duct System Installation
Thermostat and Temperature Control Issues
Checking Thermostat Settings and Operation
Recalibrating the Thermostat
Understanding Thermostat Compatibility
Safety Mechanisms and Fault Codes
Understanding Safety Fault Codes
Resetting the System After a Safety Shutdown
Preventing Recurring Safety Issues
Airflow and Fan Issues
Inspecting and Cleaning Air Filters
Checking Fan Motor Operation
Addressing Airflow Restrictions

Electrical and Component Failure
Identifying Faulty Capacitors or Wiring
Checking for Tripped Circuit Breakers
Inspecting Electrical Connections

Gas Heating and Ignition Issues
Troubleshooting Gas Ignition Problems
Checking Gas Supply and Pressure
Inspecting the Heat Exchanger
When to Call a Professional
Recognizing Symptoms Beyond DIY Fixes
Understanding the Limits of Home Troubleshooting
Preventive Maintenance Recommendations